Sharing some notes on using milk paint from Real Milk Paint.
Overview
- Milk paint is unlike anything else I've used before. Because there's no binder (oil or acrylic) it seems dry, even when wet. It's like working with plaster in a funny way.
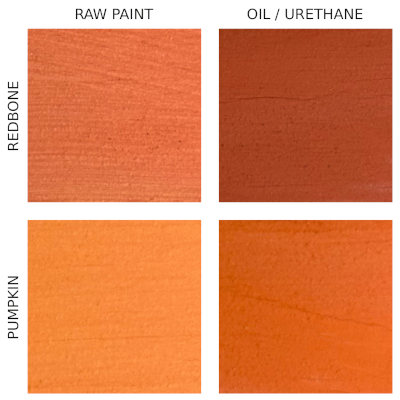
- I also found that each pigment has slightly different physical characteristcs. Redstone is has more body to it while Pumpkin is thinner given the same amount of powder and water.
- The dried paint has chalky feel, even after polishing (see below), and some of the pigment will wipe off with water even after drying for a week or more. I don't quite get the idea of leaving the milk paint without a finish of some sort.
- Take some time to experiment and get use to it before diving into finished a project. And by this, I suggest going through the whole process to finish so you can work out your own way of doing it. Real Milk Paint sells sample jars which cover 2 sf. You can probably get three coats of paint on two 4 x 4 inch panels with that.

Finishes
- Polishing: if you intend to leave the paint as is with no other finish, multiple sources recommend polishing the final surface with a dry maroon scotch brite pad followed by steel wool.
- Water poly: The paint has to be really dry before applying. I found that if the paint isn't fully dry, the water poly tends to leave a milky film. The final color of the paint will be the pretty much the same as when it's dry - the sheen of the poly does give a certain surface richness.
- Oil: Real Milk Paint recommends Tung oil and sells their own brand. Other sources suggest other types of oil including danish oils. I have boiled linseed oil on hand, so that's what I used. It gives that standard flatish oil finish but darkens the color considerably.
- Turpentine/oil/urethane: The urethane gives additional protection but is as easy to apply as oil. Brush/wipe on, wipe off excess. More of a gloss finish due to the urethane. Also darkens the colors. This is what I opted for.
- Well worth the time to run tests on the finishes beforehand. I went ahead and bought the set of sample sticks from Real Milk Paint and then wiped some oil on the ends so I have an idea of what the oil does to the color.
Mixing
- The general ratio is one to one, powder to water. I mix mine in plastic gelato containers with screw tops and they work very well.
- One of the challenges of mixing the powder and water is the mixing generates a foam which, in my experience, doesn't really go away no matter how long you wait.
- Real Milk Paint provides a marble to help in the mixing. When mixing a large amount (say half a cup) maybe add a few more marbles.
- I found a swirling motion to be better than a shake because it creates less foam. This works because I have tended to mix small amounts (up to 4 tablespoons). If you're mixing, say, a half a cup or more, not sure the swirling technique will work.
- Real Milk Paint says to mix for about 5 minutes, then let sit for 20 minutes. After that, I use a stick to stir and make sure nothing is stuck to the bottom of the container.
- Update: at the direction of Real Milk Paint support, I have begun straining the mixture through four layers of cheese cloth held in a strainer. Make the cheese cloth big enough so you can gather at the top to squeeze the last bit through. Use one implement to stir / push the paint through the cloth and a separate implement to scrape the paint from the strainer or cloth so impurities from the mix don't get into the strained paint.
- For smaller projects, mix what you will need for the number of coats you're going to apply. Store the unused portion in a refrigerator or a cooler with ice. When you go to use the paint again:
- make sure to stir and scrape the pigments that settle to the bottom.
- I have a spray bottle and give the mix a spritz or two and that tends to get it back to the right consistency.
- For larger projects, mix what you will need for one coat. I haven't experienced any problems with adding powder and water to an existing mixture.

Application - Paint
- I go for a smooth finish, not a textured or antiqued one. That said, I can see how with practice you can get a textured effect with a drier mix or a wiped type of finish with a wetter mix.
- I'm a hand tool guy, so I use a smoothing plane to prep the surface, then go over it lightly with 120 grit and spray the pieces with water to raise the grain hairs. I fill any nail holes and the like (yay dumpster wood!) and then sand again with 150.
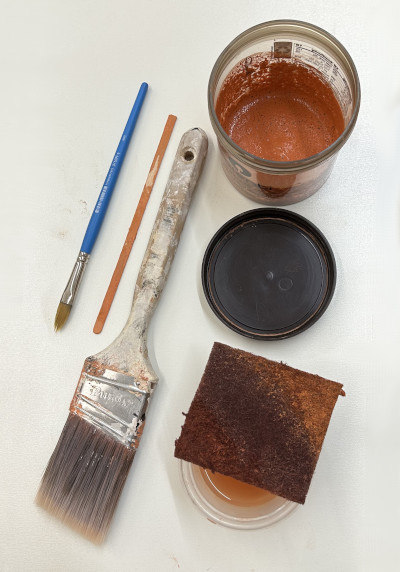
- If you're going for a smooth finish, don't buy the brush from Real Milk Paint. Use a good quality bristle brush. The RMP brush leaves too much texture and might be good for applying an oil finish (below).
- My daughter prefers foam brushes for what it's worth. I've read that smooth rollers also work. Before diving in, definitely run some tests.
- I apply three coats.
- The first coat is on the thick side to give a base.
- The second coat also tends to be thicker. The nice thing about milk paint is that it has body to it, so it can fill those little pits and hairline cracks that inevitably pop up.
- The third coat is more on the watery side, depending on how the previous two coats covered.
- I wait four hours between each coat. Before applying the next coat:
- If there are drips or ridges, I use the back side of a knife to gently scrape off the excess pigment. Don't go too heavy and expose wood. Minor surface issues can be handled in the next step.
- Then I use a maroon scotch brite pad dipped in water to rub the surface. This keeps the dust down and spreads the pigment around, evening out the surface. The water also allows for a gentler rub.
- I wipe the surfaces with a shop towel, then let that dry for a half hour before applying the next coat.
- Clean up: I find all you need is running water to clean the brush out. Obviously easier done when the paint is wet on the brush. I tried soap and water and that left a weird stiffness to the brush. Didn't seem to affect the finish though.
- When using similar colors, i.e. Redstone and Pumpkin, I use the same brush. Because the brush cleans out well and the pigments are so similar, there was no problem with the colors. If using more contrasting colors, go for separate brushes.
Finishing
- After the final coat, I let the pieces sit for at least 24 hours.
- One last rub with the maroon scotch brite pad, this time without water. Wipe with a damp towel to remove dust. This will give a polish to the surface.
- Brush or wipe on the urethane mixture, wipe off excess. Wait 24 hours, then repeat. I do three coats.
- The milk paint tends to eat up the oil/urethane. With the first coat so there's not a lot to wipe off.
- The second and third coats had some excess to wipe off after 5 or so minutes.
- When I've used the oil/urethane mix on wood, there was a uniform hardened film on top of the wood. Not so much with the milk paint.
- After 72 hours, did a quick buff with 0000 stell wool to even the overall surface then applied paste wax to the show surfaces.
- Remember: proper handling and disposal of oily rags!
Coverage
- Real Milk Paint lists the contents of a pint container as 1.25 cups or 20 tablespoons with a coverage of 35 sf per container or 1.75 sf per tablespoon.
- On the foot bench project, I used the same amount of Redbone and Pumpkin between the two benches. These calculations are based on using one color on one bench.
- I calculated the surface area of a bench as just under 4.5 sf.
- I used 7 tablespoons of powder which should cover 12.25 sf (7 x 1.75/sf)
- There was definitely waste in the amount of paint washed out of the brush and when cleaning out the jars - say 2 tablespoons - so the actual applied was 5 tablespoons which should cover 8.75 sf
- Maybe I put it on thicker than RMP expects. Or there was more waste than I figured. The moral of the story is that for small projects don't expect the full coverage as listed by RMP.
- Oil/Urethane: two foot benches took approximately 3/4 cup of mixture.
Resources
- Homemade milk paint: https://www.youtube.com/watch?v=sWKVv5tW2dQ
- April Wilkerson does a chair: https://www.youtube.com/watch?v=BVJnYJ43jnU&t=293s
- Erik Curtis on the urethane finish mix: https://www.youtube.com/watch?v=rwXp1ckA0xg&t=92s
- Here's a screen grab from the Tauton Press on milk painting
- Real Milk Paint's Buyers Guide